

I thought this WIIW topic was fitting for the start to a new year/winter time since I have been logging almost 100% of my miles on it lately. We’ll cover what the different types of indoor trainers, their upsides and their downsides (sorry it’s not all unicorns and lollipops), and I’ll talk a little bit about my current routine on the trainer.
But first let’s clear up the myth that cycling indoors is boring. I’m here to tell you that it isn’t, but sometimes it is. What you say?! Hey, I’m just being honest. The fact is it doesn’t HAVE to be boring, but it still can be, but there are ways to get around that. Keep reading and I’ll tell you what I’ve been doing lately to stay engaged while riding nowhere.
Alright, now for the main attraction! There are 4 basic categories of indoor trainers out there for you to choose from. You’ve got wind, fluid, and magnetic resistance types and then you have their crazy cousin rollers. Their price points range widely, and I will say in my experience you get what you pay for within each type so if you plan on using it a while, invest (unless you can get a sweat deal on Craigslist). There are others that are drivetrain based, but we’ll be discussing the wheel-on options here since that is the most common for at-home cyclists.
Wind
Here’s what you do, you get a big fan and stick it in front of you while you ride around the

room in a tight circle. Oh, that’s not how that works – my bad! Wind based trainers have been around a while and currently are the leading cheapest models out there, so that’s happy news for the wallet. Some of you may have even seen old-school stationary bikes with a fan attached at either the front or back “wheels”, my mom actually had one of these growing up and it was a great way to cool down someone else in the room. It looked something like this one here, and often had those movable arms like an elliptical.
Wind resistance trainers drew inspiration from these stationary bikes but have definitely innovated on the style and function. They work by connecting your bike to a fan, the faster you spin those cranks, the more resistance you experience. Gone is the wheel sized fan, these trainers

utilize a much more compact version One of the most popular and highly rated is the one offered by CycleOps coming in around $169 currently. Your rear wheel is held to the unit by the top bracers clamping onto your rear skewer (you may need to get a compatible skewer depending on your bike). The rear wheel rests on the barrel in the back which adjusts to accommodate several wheel sizes. The fan spins as you pedal and the rest is pretty much history.
Wind trainers are a great option for anyone on a budget since most can be picked up for what this CycleOps model runs or less. If you’re not sure how you’re going to feel with an indoor trainer, then wind trainers might be a good introductory option for you. Also, if this is just looking for a rainy day trainer, and you do’t often get many of those, I would say save the money and use a wind trainer. One word of caution, they tend to be the noisiest of the trainers, so set it up somewhere out of ear shot of everyone else in the house or put some music on to drown it out.
Fluid
The set up on the wind, fluid, and magnetic are all relatively the same – pop your skewer into a clamping holder and the rear wheel sits on a barrel that spins as you pedal. The major differences come in HOW the resistance is applied. You just read about wind resistance, another equally popular and higher price point version is fluid resistance. You could just take your bike to the pool and try and ride around underwater but the whole needing to breathe thing limits this possibility PLUS Mythbusters already did this.
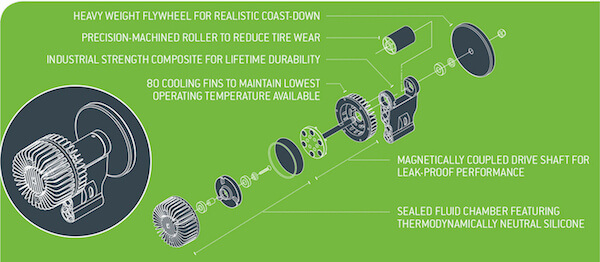
So there is a little misnomer about fluid trainers, they’re also magnetic (most of the time). There is a magnetic flywheel WITH thick oil in the chambers. Bike Trainer Guide posted a wonderful graphic on this (above). This fluid adds to the resistance and is supposed to have the most road-like feel of all the trainers. It’s on the pricier end, I was lucky and got my CycleOps Fluid2 model at half price during an open box sale, but it typically runs the $350-$400 ranger. I’ve heard great things about the Kinetic Road Machine line as well, similar price point.
One thing to be mindful of is the fact that with heavy use, the oil could potentially heat up and burn out or cause a leak. I have yet to experience that or know anyone who has. The biggest, most common issue is just the wear on the tires, as comes with any trainer that your wheel sits on. You can buy a tire specifically meant for trainers which stands up to the heat produced and the wear and tear, but opinions are mixed on whether you need this. Aside from that, it is MUCH quieter than wind resistance models. The noise I hear from mine comes from the tire on the barrel, which could be alleviated if I weren’t using a MTB tire on it – but hey, you gotta use what you got.
Magnetic
OK, last of the squeeze your back wheel onto a clamp and let it roll on a barrel type of

trainers is magnetic. Magnetic or “mag” trainers, like fluid, offer varying resistance levels and are quieter than their wind counterparts. The resistance is provided by a magnetic flywheel, and some newer models offer an electromagnetic version that allows the user to change resistance with a remote for example.
Conquer offers up a model that I have seen some nice reviews on for around $75. Definitely a great price, but with how often I’ve seen these crap out, I’m not sure it’s worth the pain to have to replace as often. Also, the resistance it offers is a smaller range as compared to the fluid trainers. But if budget is your main concern, go for it but be prepared to have to repair or replace. And if budget is the only concern, I’d say make the step up in price to a wind resistance model, it’s more upfront but more durable overall.
Rollers
That leaves us with the most expensive and more challenging model of indoor trainer. BTW – being challenging doesn’t have to be negative, I like a good challenge. What rollers offer up is the fact that both your wheels are spinning as if you were on a road. Basically your bike sits atop 3 rollers freely and you pedal to your hearts content. Resistance is provided by the diameter of the rollers themselves (smaller = higher resistance) or by adding on wind, fluid, or magnetic components (thought we finished with them huh?).

The challenge with this method is balance and staying on the rollers, it’s easy to roll off until you get the hang of it. Sorry for the horrible pun. Big bonus on these models is they are quiet and compact! The other models we covered can fold up to take up less real estate but rollers can slide under a bed, or hang on a wall in the garage. One big consideration is cost. For as simple as they look, they range in price depending on materials used and any additional components, so you can get away with a basic model for $150 or go all out and get one for $600. Tacx Antares will set you back around $250.
What about me?
Well hopefully now you have a better idea of what indoor trainers are and which one might work the best for you. Currently I use CycleOps Fluid2 and have been using it for 3 years without issue. Since winter hit, I have been logging most all of my miles inside since the cold air hurts my respiratory system, one of the only remnants of my childhood asthma. We don’t get much if any snow here, so I do try to head outside when it’s not so cold out. But how do I keep it fun and not mind numbingly dull? Well right now I have the trainer set up in my living room, and pull it out in front of the TV and pull up YouTube videos, right now I am wrapping up Season 10 of Good Mythical Morning. I try watching stuff that will make me laugh, which GMM always delivers on, because then I can focus on having fun while my body is doing work. I also break up the monotony by including a warm up, cool down, and intervals of either sprints, heavy resistance to simulate climbs, single leg work, glute focus, and standing.
I’m actually thankful for the indoor training because I haven’t been able to do a standing pedal since I was a kid and I was able to figure out the mechanics again with the trainer’s stability assist. I’m also doubly thankful that it provides me a means not to slack off, without it I would not be able to stay consistent with my goals during a portion of the year. And since I’m moving back a part of the country with ACTUAL winters, my trainer will be more useful than ever before.
There are definitely a lot of trainers out there, including some that are meant more for commercial spaces and can run up a bill of over $1000 or more. You don’t have to spend a lot, just figure out what works best for your space and how much usage you will get out of it. And if you need more of a competitive spirit to get you going indoors, consider signing up for services like Zwift or Trainer Road. I’ll be signing up for Zwift in the next couple months and will give a review after I spend some time with the platform, so be on the lookout for that in the Spring.
